Saturday, May 22, 2010

Fondant Cakes

Oh Goodness where has the time gone? It has been over a month since I updated and so much has happened since then.

First and foremost, I have been accepted to Culinary School, and I graduated from Business School so I can finally focus on the sweeter and more important things in life.

Secondly, a few very important birthdays went by. My dear brother Snorlax had a birthday and cutie Sami had a birthday. So if nothing else this is a picture post of the cakes I made for their birthdays.


First up, Snorlax cake for my dear brother Snorlax. This was my first time baking in a bowl and I had to keep putting it back in the oven because the middle just would not bake through! I did end up with a nice round tummy for the snorlax though and was pretty happy with the results.


Then for cutie Sami I came up with the idea of trying my hand at a purse cake. More notably, a TokiDoki purse cake. Unfortunately, when I put the cake to let it chill out in the fridge some how the fridge door was left ajar and cake caved in a bit on itself resulting in lumps. So it is a bit of a lumpy purse, she loved it so I decided to chalk this up to experience and not get too upset about it. Especially, considering I made it faster than any other cake and it was also bigger than any other cake I had done before!

There's nothing like cutting out 200 little fondant stars at 1 am :)

Back of the purse:


Front:


Thursday, April 15, 2010

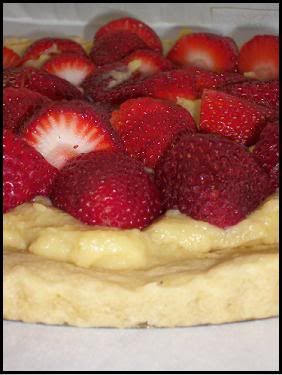
Strawberry Tart


What is it about Business school that keeps getting in the way of my baking? In all seriousness I'm excited about the thought of getting to bake every day. I've been stressed out all week and when I came home I found that we actually have a tart pan. How have I lived here all this time and not known that we had a tart pan is beyond me but I took it as a sign that I needed to bake today. Since strawberries are in season I thought I'd try my hand at a french strawberry tart that Ina Garten showed recently on Barefoot Contessa.

My cream turned more yellow than hers because I accidentally put in too much vanilla extract but after tasting the cream after it chilled I'm not convinced that it was a terrible mistake after all.

Ingredients:
Crust:
  • 1 1/4 Cup Flour
  • 3 tbsp sugar
  • 1/2 tsp salt
  • 3/4 stick of butter
  • 2 tbsp shortening
  • 1/4 cup ice water

It's best if the ingredients are cold it creates a flakier crust.
  1. Combine the flour, sugar and salt in a food processor. Add the butter and shortening, and combine until the dough creates pea sized balls.
  2. Add the water and combine until the dough forms.
  3. Chill.
While that's chilling, work on the cream!


Cream:
  • 1 1/2 Milk
  • 5 egg yolks
  • 3/4 cup of sugar
  • 3 tbsp cornstarch
  • 1 1/2 teaspoons vanilla
  • 1 tablespoon butter
  • 1 tablespoon heavy cream
  1. Set the milk and medium high heat. You don't want to boil it but it needs to be heated up.
  2. Beat egg yolks and sugar until they become light in color and thick. About 3 minutes, then add cornstarch.
  3. Add the scalded milk slowly or you'll end up with scrambled eggs. Actually, the cornstarch helps prevent that but one can never be too careful!
  4. Put the mixture back into the pan over medium heat and stir in the vanilla, butter and cream. Stir until it thickens and then switch to stirring with a whisk. To make sure everything is nice and creamy you can put the mixture through a siv.
  5. Pour into a bowl and place clip wrap directly on top of the cream to prevent a skin from forming and let it chill in the fridge!
Now to go back to the crust. Roll out the crust and place it in the tart pan, and don't be like me and stretch it out because it will, it will shrink. Ina Garten even said "Don't stretch the dough because it'll shrink" and I didn't listen ^^;;. It doesn't shrink dramatically but you end up with something the resembles a pizza instead of a tart.

Bake the crust at 375 degrees for 10 minutes with a butter piece of foil on top of it covered with beans to make sure the crust does not puff up. After 10 minutes take off the foil with the beans and place the crust back in the oven for another 15-20 minutes.

Once the crust is out of the oven and cooled spoon the cream into the crust and then cover in lovely strawberries.


Saturday, March 13, 2010

Baked Shrimp Scampi

So when I started this blog I figured for the most part it would be filled with sweets but recently I was watching Barefoot Contessa and Ina Garten (my hero!) had a fantastic recipe for Baked Shrimp Scampi so I just had to try my hand at something baked and savory.


Ingredients:

  • 2 lbs Large raw shrimp

  • 3 Tablespoons Olive Oil

  • 2 Teaspoons salt

  • 1 Teaspoon pepper

  • 1 1/2 sticks of butter-Room Temp

  • A dash of Garlic powder

  • 1 Shallot Diced

  • 3 Tbsp parsley

  • 1 teaspoon lemon zest

  • 2 Tbsp lemon juice

  • 1 Egg yolk

  • 2/3 cup panko or bread crumbs


Recipe:

  1. Peel, de-vein, and butterfly the shrimp so they stick they're little tail in the air.

  2. Place the shrimp, Olive oil, salt and pepper in a bowl. Toss together and allow to sit while you prepare the topping.

  3. Combine the butter, garlic (I use a dash but you can used how ever much you like if you're a big fan of garlic), shallot, parsley, lemon juice, lemon zest, yolk and mash it together. This is another instance where your best tool is a pair of clean hands.

  4. Mix in the panko crumbs.

  5. Arrange the shrimp in a glass or gratin dish so they're little tails are up in the air. Since you've butterfly'd them they'll be half the thickness they'll cook quickly.

  6. Cover with the panko crumb mixture.

  7. Bake at 425 degrees for 10 minutes.

  8. Squeeze some lemon juice on top of scampi as soon as it comes out of the oven and enjoy!


Thursday, March 11, 2010

Chocolate Chip Cookie Dough Cheesecake Bars

Man Business school is such the time suck, but I cannot believe that I'm already half way through my last semester and just that much closer to culinary school...hopefully.

Unfortunately, this meant not too much baking was happening but then I was directed towards a recipe. A recope that makes you gain 5 pounds just from looking at the images.

Chocolate Chip Cookie Dough+Cheesecake bars=Love...and fat

These bars accomplish what I hope every baked good to accomplish. The eye close. That magical reaction to something that taste so good you have to close your eyes to just take in everything. I am please to note that everyone that I presented these beauties to did the same thing. Everyone did the eye close and to me that's amazing, but enough about how much people enjoyed these let's get onto the pictures and recipe!
Photobucket

Ingredients:
Crust:
  • 1 1/2 Cups graham cracker crumbs

  • 5 Tablespoons of melted butter


Cookie Dough:
  • 5 Tablespoons of butter (room temp)

  • 1/3 cup brown sugar

  • 1/4 teaspoon salt

  • 1 teaspoon Vanilla extract

  • 3/4 Cup flour

  • 1 Cup of chocolate chips


Cheesecake:
  • 10 oz. creamcheese

  • 1/4 cup sugar

  • 1 Large egg

  • 1 teaspoon vanilla extract


Recipe:
  1. Preheat the oven to 325 degress

  2. Butter a 9x9 pan and line it with parchment paper (the butter keep the parchment paper in place) & leave enough to extend over the side.

  3. Combine the crumbs and butter until moistened

  4. Press the mixture into the bottom of the pan and up the sides.

  5. Bake for 6 minutes and allow to cool while you're making the next two parts.

For the cookie dough
  1. Mix butter, brown sugar, salt, and vanilla extract at medium speed until smooth

  2. Drop to slow and add flour

  3. Stir in the chips

  4. Set aside...and maybe take a nibble for yourself.


For the Cheesecake
  1. Beat cream cheese and sugar until smooth.

  2. Add egg and vanilla, beat until blended

  3. Pour into that lovely crust!

  4. Drop some cookie dough over the filling

  5. Bake for 30 min.

  6. Cool for 1 hour


That hour takes forever but I promise if you stick out you will be well rewarded, and what amazing is that since the cookie dough doesn't have any egg in it, it still deliciously doughy.
Photobucket

Monday, February 22, 2010

Quadruple Chocolate Cake Truffles

Wow, it has been a while. One of the biggest chocolate consumption holidays passed so for Valentine's Day I made the boyfriend something rather special. On Valentine's Day the first year the boyfriend went to college I made him a basket of goodies, including a jar of truffles. The truffles seemed to be a hit with him (and part of his dorm) so I've been looking for ideas to shake things up a big with truffles.

First and foremost bake a cake. Any cake you desire really. For this project I used Double Chocolate cake (chocolate cake with chocolate chips in it; be sure to toss the chips in some flour first so they don't all sink to the bottom). Once your cake is out of the oven and has cooled the fun can begin. Go against all your baking instincts and toss the cake into a bowl.


It feels wrong at first but you must remind yourself that the end result is worth it, so go a head and just tear that cake up.

Next you'll want to add about 3/4ths a can of your favorite frosting. You can of course make your own frosting and should you decide to you'll need about 12 oz. For this project I used Dark Chocolate frosting.


I used a cookie scoop to form the balls but you'll want to use your hands to form them and made them into round balls. Stick them in the fridge while you make the ganache.

I used Ganache for the coating on these truffles because the way the chocolate melts in your mouth is absolute heaven. It gives the truffles a beautiful coat but stays somewhat soft so once you pop those puppies in your mouth the chocolate has already begun to melt and you're getting that intense chocolate flavor.

You'll want to place the truffle in the ganache and roll it around a little bit. Place it on a fork and move the fork back a forth while spooning on more ganache to get a smoother coat.

I can't believe I didn't take a better picture of these before I gave them to the boyfriend. He ended up inhaling them, then on Valentine's day when I made him dinner (what? I can't make sweets all the time can I?) we put some of the last truffles on top of the ice cream we had for dessert.


Luckily for Valentine's Day the boyfriend bought me a mini photoshoot area so hopefully I can start taking better pictures of my stuff. You know, if he doesn't inhale them first.

Monday, February 8, 2010

Chocolate Caramel Puff

My earliest memory where I knew I loved chocolate was watching Death by Chocolate with Marcel Desaulnier with my mother. So imagine my surprise when I found out we had a cookie cookbook by Marcel for 20 years without me knowing it!

I ended up reading the whole cookbook in one night (am I the only one that reads cookbooks like regular books?)

Ingredients for the Chocolate Pate Au Choux (puff dough):
  • 1/2 cup all-purpose flour
  • 2 tablespoons unsweetened cocoa powder
  • 1/2 cup of water
  • 4 tablespoons unsalted butter
  • 1 tablespoon granulated sugar
  • 3 large eggs
  1. Preheat the oven to 375 degrees.
  2. Sift flour and Cocoa powder together then set aside.
  3. Heat the water, butter, and Sugar. Once the mixture is hot stir with a wooden spoon to dissolve the sugar and bring to a boil.
  4. Remove from the heat and add the dry ingredients.
  5. Stir with the Wooden Spoon to stir until the mixture comes together.
  6. Once the mixture has come together add each egg one at a time after each on is incorporated.
  7. Divide the dough into 24 portions and bake for 20 min.-when baking half way through the time switch and rotate your pans.


While those bake it's time to work on the Caramel Chocolate Ganache!

Ingredients:
  • 8 ounces semisweet chocolate (chopped)
  • 4 ounces of unsweetened chocolate (chopped)
  • 1 1/2 cups heavy cream
  • 2 tablespoons unsalted butter
  • 1/2 cup granulated sugar
  • 1/8 teaspoon fresh lemon juice
  • Splash of coffee
  1. Place the chopped chocolate in a bowl and set aside.
  2. Heat the heavy cream and and butter over medium heat. You want to melt the butter and then allow the cream to simmer.
  3. In a separate, saucepan combine the sugar and the lemon juice. Stir with a whisk to combine and caramelize for 7 to 8 minutes. This was especially exciting for me because I have never made caramel before, and at the 6 minute mark I was standing there thinking there's no way this is going to turn into caramel but lo and behold:

  4. Pour 1/2 the hot cream into the sugar and stir with whisk until it stops bubbling. Then pour the rest and stir until smooth.
  5. Pour over the chocolate and allow to sit for 5 minutes before stirring with whisk to stir. Here is where I add a splash of coffee because it really brings out the flavor of chocolate.
  6. Allow to sit until the ganache gets thick.
  7. Now that your puffs are out of the oven and your ganache is thick it's time to slice the puffs horizontally.
  8. Pipe the ganache on the bottom half of a puff and top with the other half and then prepare yourself for heaven in your mouth.


I made these especially for my sweetie as an early valentines day sweet, and I was really happy with the outcome. These are perfect for the chocoholic in your life (or for yourself if you have a chocolate addiction like me.)

Tuesday, February 2, 2010

Cake Brownies

My mother brought home a brand new cook book which led to me making brownies.

Ingredients:
  • 1 1/4 up sugar
  • 3/4 cup butter
  • 1/2 cup unsweetened cocoa powder
  • 2 eggs
  • 1 teaspoon vanilla
  • 1 1/2 cups all-purpose flour
  • 1 teaspoon baking powder
  • 1/4 teaspoon baking soda
  • 1 cup milk
  • Splash of coffee
  • Fudge Frosting (recipe below)
  1. Preheat oven to 350 degrees, and grease a 15 x 10 x 1 pan.
  2. In a pan heat sugar, butter, and cocoa powder. Stir and combine until the butter is melted. Then remove from heat. Add Eggs and vanilla, with a wooden spoon combine. -Should you want to add the splash of coffee now would be the time. Coffee really brings out the chocolate flavor of the sauce.
  3. In a separate bowl combine flour, baking powder and baking soda.
  4. Add flour mixture and milk alternately to the chocolate mixture, beating and combining each time. The mixture is going to be a bit thinner than normal brownie mix.
  5. Bake for 20 minutes!When they come out they'll be nice and gooey and light. Like a cake but more dense.

  6. Let cool for 2 hours (I know It sounds long but good things come to those that wait). Spread the chocolate fudge frosting on top. Cut and enjoy!

Ingredients for Frosting:
  • 4 3/4 cups of sifted confectioners sugar
  • 1/2 cup cocoa powder
  • 1/2 cup of butter
  • 1/3 cup of boiling water
  • 1 teaspoon of vanilla
  1. Combined powdered sugar and cocoa powder. Add butter, boiling water, and vanilla. Beat with an electric beater on low speed till combined. Beat for 1 minute on medium speed. Cool for 20 to 30 minutes or till the frosting looks spreadable.
  2. Put on top of cake brownies and enjoy.
These brownies are light and chewier than Brownies but more dense than cake, either way they're absolutely addicting.

 
Blog Template by Delicious Design Studio